
Tags
braided bread, breakfast braid, chevre, cream cheese & olive, enriched bread dough, fresh herbs with bread, herbed goat cheese, King Arthur flour
I am guessing you have encountered a sweet braid in your time: they’re impressive to look at, decadently filled with cream cheese and fruit, or nutella, or jam– and even more fun to eat. But have you ever encountered a savory braid? I hadn’t, and in mid-December I began experimenting, hoping to find an accompaniment to the pork roast I was planning to make for Christmas dinner. My braid dough of choice is an enriched dough, with butter, eggs and extra dairy; it wasn’t a hard adaptation to leave out some sugar and switch the yogurt for sour cream to send it away from breakfast and toward dinner. (Not that you couldn’t eat savory bread for breakfast… but we’ll get there.) I absolutely love working with this dough: it is soft and pliant, fragrant, a lovely golden yellow color and it rolls out like a dream. My method for the savory braid includes an overnight proof in the refrigerator, which means you have to plan a little in advance, but don’t have to spend an entire day waiting for and tending to your dough. I really couldn’t be happier with how the recipe responded to my changes.
This recipe will make two full-size loaves. That’s a good amount of bread! Luckily, the dough freezes very well, though I will note that thawed dough turned out a crisper finished product than fresh. I actually liked the crisp edges quite a bit. For the fillings, I am sharing two set to my liking but infinitely adaptable to suit yours. The first is made with soft goat cheese and herbs, a mix of fresh and dried. The chevre, when baked, becomes slightly grainy in texture; I didn’t mind, but my husband noticed right away. If you don’t care for the tang or texture of goat cheese, substitute an equal amount of cream cheese. For the herb blend, the mix I used represents the mix I found I liked best with goat cheese; any soft herbs like basil, oregano, parsley, thyme, dill, even mint, could be used in tandem. If you have only dried herbs, use any of those mentioned above, a total of about 2-3 tsp. to begin. My second filling was inspired by a sandwich filling I used to eat with my Grampa, which always makes me think of 1970’s canapes: cream cheese and olive! Don’t knock it ’til you try it– the blend of briny, salty olives, bright dill and lemon, and cream cheese is one of my favorite comfort foods. Each filling recipe below is enough for one braid. If one looks particularly good, just double the recipe to fill both braids. In addition to changing the herbs, you could add crumbled cooked bacon to the chevre filling, or roasted red peppers to the cream cheese & olive. Try adding a few slices of prosciutto under either filling, or some quickly-sauteed sliced mushrooms. As long as you don’t radically alter the proportion of filling to dough– have fun playing!
To serve, slice warm or room temperature savory braid cross-wise into thin slices. I also like the cream cheese & olive bread straight from the refrigerator; it reminds me of the sandwiches I mentioned above. A savory braid goes well with just about any entree with which you would serve bread. Getting back to the idea of savory braid for breakfast: one of my favorite ways to eat it, especially the chevre and herb-filled bread, is lightly warmed or toasted with soft scrambled eggs alongside, or on top. So good! I really can’t stress what a dream dough this is to make, and the braiding process is one of those “looks harder than it is” kitchen tasks that is sure to wow your friends and family. In the winter I love baking bread to warm up the house– if you need another excuse to give it a try! That said, I promise the flavor of your savory braid, regardless of which filling you choose, is reason enough.
Savory Braid (adapted from King Arthur Flour; makes 2 loaves)
For the sponge:
- 3/4 c. warm water
- 2 tsp. sugar
- 1 T. instant yeast
- 1/2 c. all-purpose flour
For the bread:
- all of the sponge
- 3/4 c. sour cream, at room temperature
- 8 T. unsalted butter, softened, cut into small pieces
- 2 large eggs, at room temperature
- 2 tsp. kosher salt
- 4 – 5 c. flour
For the herbed goat cheese filling:
- 4 oz. soft goat cheese (chevre), at room temperature
- 2 T. sour cream
- 2 T. fresh basil
- 2 T. fresh parsley
- 1 garlic clove, crushed
- 1/2 tsp. dried dill
- kosher salt & black pepper to taste
For the cream cheese & olive filling:
- 4 oz. cream cheese, softened
- 1 T. unsalted butter, softened
- 1/2 c. pitted green Spanish-style olives, with or without pimientos, roughly chopped
- 1 T. fresh dill, minced
- 1 tsp. lemon zest
- freshly ground pepper
- kosher salt to taste (optional, depends on olives)
Day 1: Start by making the sponge. In a medium glass or ceramic bowl, mix all four ingredients; cover loosely and place in a warm spot to proof for about 15 mins.
To the bowl of a stand mixer with a dough hook attachment, add the sponge (which should be bubbling gently and fragrant like warm bread), sour cream, butter, eggs, salt and 4 c. flour. Starting on low speed, let the mixer run until most of the flour is incorporated. You can move the speed up to about medium once the dough is starting to come together; mix for about 5 mins. total. Assess whether the dough is very sticky: it should be forming a rough ball around the dough hook, but should also be firm enough to handle without most of it sticking to your hands. I needed to add another 1/2 c. flour to make the dough smooth enough, and you might need as much as 1 c. extra; proceed slowly, as you don’t want to overcompensate and add too much. When you have a springy, soft ball that you can handle easily but looks smooth, and fills the imprint out when you press your thumb lightly into the dough and move it away, it is ready. Add a small amount of oil to a glass or ceramic bowl at least three times larger than your dough ball; run the dough around the bottom of the bowl to coat it in oil, cover the bowl with plastic wrap, and move to the refrigerator. Allow the braid dough to rest overnight; it should at least double in size.
Day 2: Make the filling(s) you plan to use. Each is simply a put-everything-in-the-bowl, stir and taste kind of deal. Set aside. Preheat the oven to 375 degrees and cover two sheet pans with parchment paper.
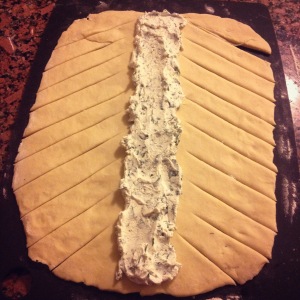
Divide the dough into two even pieces. Prepare a bread board by sprinkling a large cutting board, clean counter surface or wooden board lightly with flour. Roll your first dough piece into a rectangle, a little less than 1/2″ thick. The dimensions are less important than the shape; King Arthur recommends 10″ x 15″ if that is helpful. When you have one rectangle ready, dollop one filling recipe down the center, from one short end to the other, leaving about 1/2″ margin at each end. Using a sharp knife or pizza wheel, cut diagonally into the exposed dough on one side of the filling, from just outside the filling to and through the edge. Repeat, spacing your cuts out so your resulting strips of dough are 1″ thick and matching the angle of the previous cut, until you reach the bottom. Repeat on the other side, making sure you create the same number of cuts on each side. Refer to the picture above for an example of filling placement and diagonal cuts.
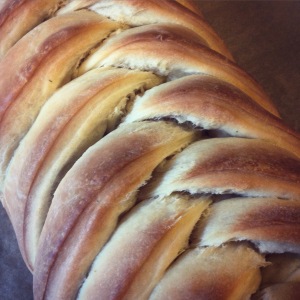
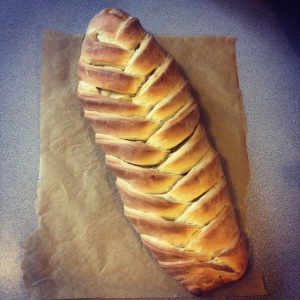
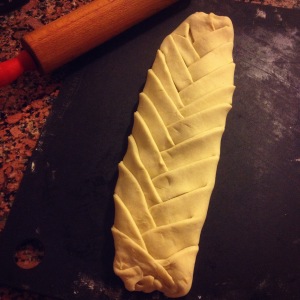
Working from the top down, start by folding the margin of dough you left at the top over the filling to seal the end. Now start to braid! Place the top cut piece, on either side, over the filling, pulling over and down very slightly to ensure a tight fit. Then, the corresponding piece on the opposite side comes up and over your first piece of dough, also at a slightly downward angle. Repeat this, alternating sides, until all pieces are “braided”. You will have some overflow dough at the bottom; just roll this up toward the filling and pinch to seal. Your braid will look like this:
You can see that each strip slightly overlaps the one before and above it, and the sides are uniform. I found that a little filling showing through was okay, but too much caused a mess in the oven, so try to cover most of the filling neatly. This is a forgiving dough, and it doesn’t need to be perfect. Work deliberately and I bet it will turn out beautifully.
At this point, you can repeat the process to make a second braid, or wrap the remaining dough ball carefully and place it in a freezer-safe container or bag. The dough will keep in the freezer for at least 6 weeks. Thaw completely at room temperature, until the dough no longer feels cold, before beginning the braid process.
Place your shaped braids on parchment-lined baking sheets and cover each loosely with a cotton towel. Allow the braids to rest in a warm area for about 45 mins. Bake the rested braids for 25-30 mins., until golden brown and hollow-sounding when tapped. You can very gently pry apart a thick spot in your braid to ensure all layers are cooked. Cool for at least 30 mins. before slicing to serve.
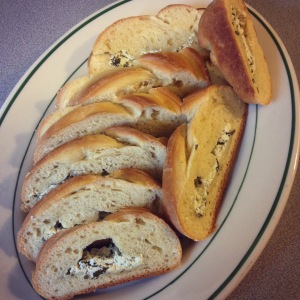
All photographs in this post were taken of a braid made with the herbed goat cheese filling.
